
Carbon Black EDR Sensor
Installation Guide
14 August 2024
VMware Carbon Black EDR services
You can find the most up-to-date technical documentation on the VMware by Broadcom website at:
https://docs.vmware.com/
VMware by Broadcom
3401 Hillview Ave.
Palo Alto, CA 94304
www.vmware.com
Copyright
©
2024 Broadcom. All Rights Reserved. The term “Broadcom” refers to Broadcom Inc. and/or its
subsidiaries. For more information, go to https://www.broadcom.com. All trademarks, trade names, service
marks, and logos referenced herein belong to their respective companies.
Carbon Black EDR Sensor Installation Guide
VMware by Broadcom 2
Contents
Preface 5
1 Overview of Carbon Black EDR Sensors 6
Third-party AV Scan Exclusions 7
Obtaining Sensor Installation Packages 9
2
Installing Windows Sensors on Endpoints
10
Windows Sensor Host File Encoding Support 10
Enabling FIPS for Windows Sensors 11
Install Windows Sensors on Endpoints 12
Configure Proxy Settings for Windows Sensors Versions 6.2.3 and Later 13
Configure Proxy Settings for Windows Sensors Versions Prior to 6.2.3 14
3
Installing macOS Sensors on Endpoints
15
Granting macOS Sensor v7.0+ Access on macOS v11.0+ Big Sur 15
Manually Approve the System Extension and Network Filtering 15
Approving the System Extension with MDM 16
Approving Network Filtering with MDM 16
Granting the Sensor Full Disk Access 17
Install macOS Sensors on Endpoints 19
4 Installing Linux Sensors on Endpoints 21
Prerequisites for Linux 4.4+ Kernels for Linux Sensor Versions 2.10+ 21
Verify Linux 7.1+ Install Files 23
Install Linux Sensors on Endpoints 25
Enable FIPS 140-2 for Linux Sensor 7.3.0+ 26
5 Upgrading Carbon Black EDR Sensors 28
6
Downgrading Carbon Black EDR Linux Sensors
30
7 Uninstalling Carbon Black EDR Sensors 31
Uninstall Sensors through the Console 31
Uninstall Windows Sensors Directly on Endpoints 32
Uninstall macOS Sensors Directly on Endpoints 32
Uninstall Linux Sensors Directly on Endpoints 32
8 Troubleshooting Carbon Black EDR Sensor Installations 34
VMware by Broadcom
3
Troubleshooting Windows Sensor Installations 34
Generate and Send Windows Sensor Diagnostic Data Logs 35
Collect Windows Sensor Diagnostic Logs with Tamper Protection Enabled 36
Troubleshooting macOS Sensor Installations 37
Verify macOS Sensor Installations 37
Log Communications to Troubleshoot macOS Sensor Installations 38
Manually Start and Stop macOS Sensor Daemon 39
Determine macOS Sensor Version 39
Determine Server URL to Troubleshoot macOS Sensor Installations 40
Initiate an Immediate macOS Sensor Check-in to the Carbon Black EDR Server 40
Initiate a macOS Sensor Diagnostic Data Dump 40
Using the Diagnostic Uploads Utility on macOS Sensors 40
Enable macos Sensor Diagnostics Uploads 41
Automatically Upload macOS Sensor Diagnostic Data 42
Manually Upload macOS Sensor Diagnostics Data 42
Data Collected by macOS Sensor Diagnostics 43
Troubleshooting Linux Sensor Installations 44
Verify Linux Sensor Installations 44
General Logging to Troubleshoot Linux Sensor Installations 46
Generate Linux Sensor Communication History 46
Manually Start and Stop Linux Sensor Daemon 47
Determine Linux Sensor Version 48
Determine Server URL to Troubleshoot Linux Sensor Installations 48
Initiate an Immediate Linux Sensor Check-in to the Carbon Black EDR Server 48
Linux Driver Debug Parameters 48
Linux Daemon Debug Options 50
Initiate a Linux Sensor Diagnostic Data Dump 51
9 Document History 52
Carbon Black EDR Sensor Installation Guide
VMware by Broadcom 4
Preface
This guide explains how to install, uninstall, upgrade, and troubleshoot Carbon Black EDR
sensors.
Intended Audience
This information is intended for anyone who wants to install, uninstall, upgrade, or troubleshoot
Carbon Black EDR sensors. The information is written for experienced system administrators.
Document History
For a list of changes made to this guide, see Chapter 9 Document History.
VMware by Broadcom 5
Overview of Carbon Black EDR
Sensors
1
This guide describes how to install, upgrade, uninstall, and troubleshoot Carbon Black EDR
sensors.
Carbon Black EDR provides lightweight sensors for installation on endpoints such as laptops,
desktops, and servers. You install a sensor on each endpoint in your enterprise. After installation,
sensors gather event data on the endpoints and securely deliver it to the Carbon Black EDR
server for storage and indexing.
You can use the default certificate to secure communications or provide your own certificates.
For more information about certificates, see "Managing Certificates" in the
Carbon Black EDR
User Guide
.
To manage sensors after installation, see "Managing Sensors" and "Sensor Groups" in the
Carbon
Black EDR User Guide
.
This publication includes troubleshooting steps for sensor installations. For additional information
about sensor health, see "Sensor Health Score Messages" in the
Carbon Black EDR User Guide
.
Carbon Black EDR supports sensors for Windows, macOS, and Linux environments.
For supported operating system versions, see the sensor-specific Operating Environment
Requirements (OER) guides at https://docs.vmware.com/en/VMware-Carbon-Black-EDR/
index.html.
To access the Download Sensor Installer controls for a sensor group, you must be one of the
following:
n A user that is a member of a team that has either the Viewer or Analyst role for the sensor
group.
n For Carbon Black EDR installations, a Global Administrator.
n For Carbon Black Hosted EDR installations, an Administrator.
Read the following topics next:
n Third-party AV Scan Exclusions
n Obtaining Sensor Installation Packages
VMware by Broadcom
6

Third-party AV Scan Exclusions
The Carbon Black EDR sensor performs reads and writes to the sensor's installation root
directories. With AV products continually scanning the directory contents, the following
exclusions can help ensure proper coexistence and eliminate potential interoperability problems
that can cause performance issues.
The following exclusions apply to all supported versions of Windows, macOS, and Linux.
Note
n Review vendor documentation for exclusions implementation steps.
n Some vendors require a trailing asterisk (*) when entering exclusions. Sub-folders should be
included in the exclusion. Refer to the vendor's documentation.
n Windows Defender is enabled by default on Windows machines and requires these
exclusions.
n If you are utilizing a custom Sensor Process Name, add the customized process name to the
AV application exclusions list.
n For McAfee EPO you might also need to exclude c:\windows\carbonblack\cb.exe from its
Prevent creation of new executable files in the Windows folder option.
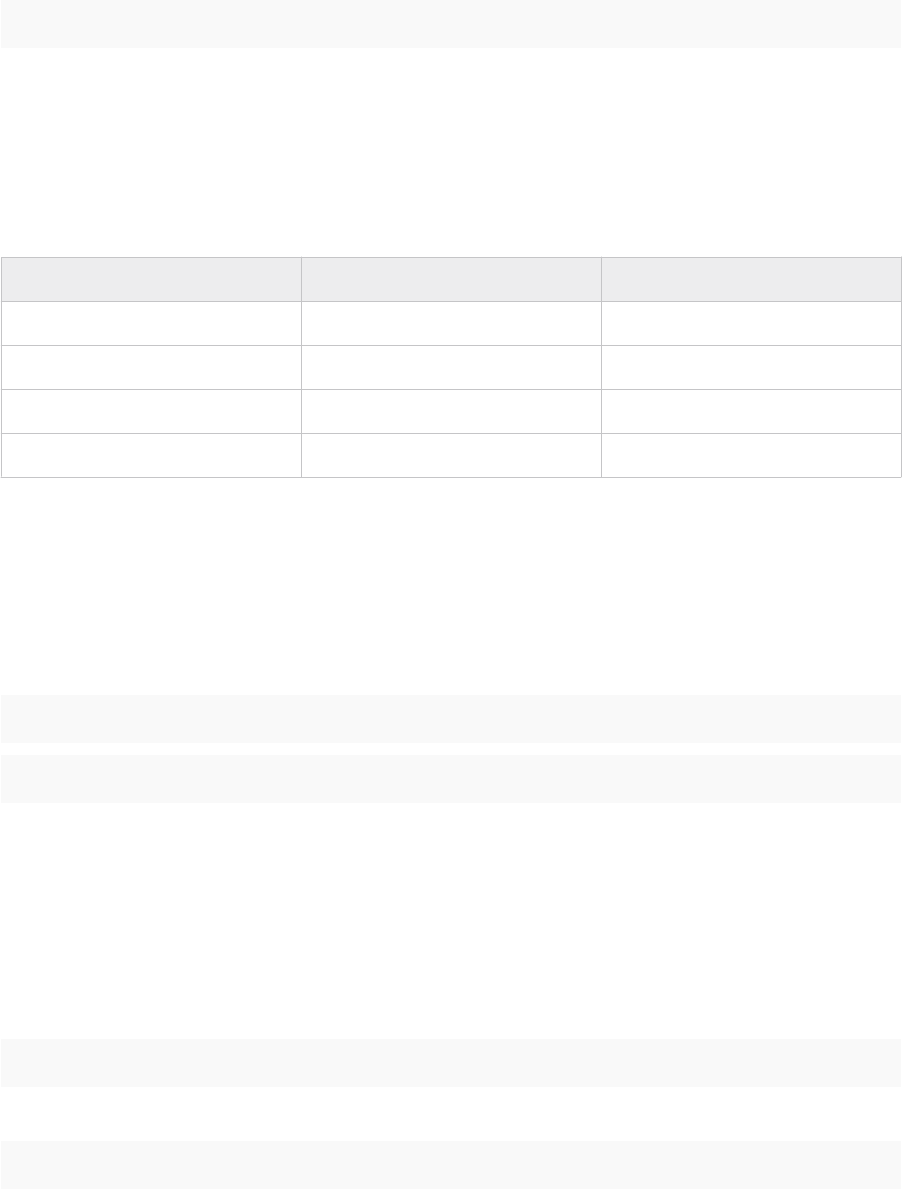
Table 1-1. Recommended folders and processes to exclude from third-party anti-virus scans
Operating System Sensor Version Path and Process
Windows 7.1.0 and later n %WINDIR%\CarbonBlack\*
n %WINDIR%\CarbonBlack\cb.exe
n C:\Program
Files\CarbonBlack\CbEDRAMSI.dll
n C:\Program Files
(x86)\CarbonBlack\CbEDRAMSI.dl
l
Windows 7.0.1 and earlier n %WINDIR%\CarbonBlack\*
n %WINDIR%\CarbonBlack\cb.exe
Carbon Black EDR Sensor Installation Guide
VMware by Broadcom 7

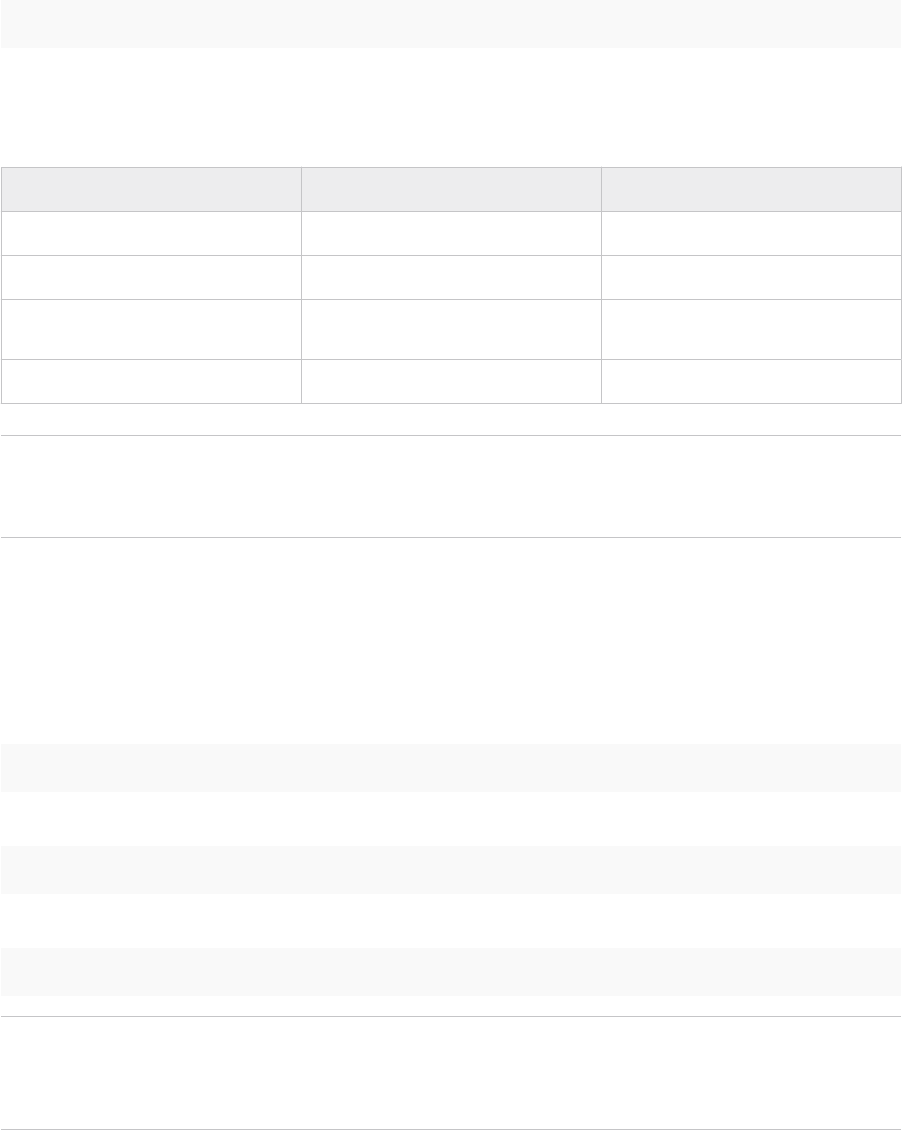
Table 1-1. Recommended folders and processes to exclude from third-party anti-virus scans
(continued)
Operating System Sensor Version Path and Process
macOS/OS X n 6.3.0 and later
n BigSur/11.x
n /Applications/VMware
Carbon Black
EDR.app/Contents/XPCServices/
CbDigitalSignatureHelper.xpc/
Contents/MacOS/
CbDigitalSignatureHelper
n /Applications/VMware Carbon
Black EDR.app/Contents/MacOS/
CbOsxSensorService
n /var/lib/cb/*
n /Library/SystemExtensions/
<GUID>/com.carbonblack.es-
loader.es-
extension.systemextension/
Contents/MacOS/
com.carbonblack.es-loader.es-
extension
macOS/OS X n 6.3.0 and later
n Pre-BigSur/10.x
n /var/lib/cb/*
n /Applications/VMware Carbon
Black EDR.app/Contents/MacOS/
CbOsxSensorService
n /Applications/VMware
Carbon Black
EDR.app/Contents/XPCServices/
CbDigitalSignatureHelper.xpc
n /System/Library/Extensions/
CbOsxSensorNetmon.kext
n /System/Library/Extensions/
CbOsxSensorProcmon.kext
macOS/OS X 6.2.7 and earlier n /var/lib/cb/*
n /Applications/CarbonBlack/
CbOsxSensorService
n /Applications/CarbonBlack/
CbDigitalSignatureHelper
n /System/Library/Extensions/
CbOsxSensorNetmon.kext
n /System/Library/Extensions/
CbOsxSensorProcmon.kext
Carbon Black EDR Sensor Installation Guide
VMware by Broadcom 8

Table 1-1. Recommended folders and processes to exclude from third-party anti-virus scans
(continued)
Operating System Sensor Version Path and Process
Linux 6.2.1 and later n /var/opt/carbonblack/response/*
n /etc/init.d/cbdaemon
n /usr/sbin/cbdaemon
n /opt/carbonblack/response/*
n /etc/sysconfig/modules/
cbresponse.modules
Linux 6.2.0 and earlier n /var/lib/cb/*
n /etc/init.d/cbdaemon
n /etc/rc*/*cbdaemon
n /usr/sbin/cbdaemon
n /etc/sysconfig/modules/
cbresponse.modules
Obtaining Sensor Installation Packages
Periodically, Carbon Black releases new sensor versions either standalone or with a version of
Carbon Black EDR server. When you install or upgrade the server, you can choose to load the
latest sensor installers, or install or upgrade the server version only.
The sensor installers are downloaded to the sensor installation directory, either the
default of /usr/share/cb/coreservices/installers, or a custom location specified by
SensorInstallerDir|Osx|Linux in the cb.conf file. (See the
Carbon Black EDR Server
Configuration Guide
for details.)
Apart from a server installation or upgrade, you can download any new sensor installers manually
from the Carbon Black yum repo.
After the installation packages are in the sensor installation directory, they can be made available
in the following places in the console:
n The Download Sensor Installer drop-down list on the Sensors page when a group is selected.
n The sensor versions available for upgrades (either automatically or manually) according to
the upgrade policy for a sensor group. See “Sensor Groups” in the
Carbon Black EDR User
Guide
.
The installer packages are made available in the following ways:
n At startup through coreservices.
n By running the following command:
/usr/share/cb/cbcheck sensor-builds --update
Carbon Black EDR Sensor Installation Guide
VMware by Broadcom 9

Installing Windows Sensors on
Endpoints
2
This section describes how to install Carbon Black EDR Windows sensors on endpoints.
Note To install sensors on Windows systems, you must belong to the Local Administrators
group or higher.
There are two ways to install Windows sensors:
n Windows Standalone EXE – Installs a sensor onto a single host. This option is useful for
bringing a new host online in your network.
n Windows MSI for GPO Installation – Deploys sensors to multiple hosts over the network
using a Microsoft Group Policy Object (GPO). This option is also appropriate for remotely
deploying sensors with third-party software deployment applications by using standard
Msiexec commands.
Read the following topics next:
n Windows Sensor Host File Encoding Support
n Enabling FIPS for Windows Sensors
n Install Windows Sensors on Endpoints
n Configure Proxy Settings for Windows Sensors Versions 6.2.3 and Later
n Configure Proxy Settings for Windows Sensors Versions Prior to 6.2.3
Windows Sensor Host File Encoding Support
You can modify the host file to enable certificate exchanges and custom certificates.
The Carbon Black EDR Windows sensor supports the following standards for encoding of the
host file:
n ASCII
n UTF8
n UTF8-BOM
n UTF16LE-BOM
VMware by Broadcom
10
Enabling FIPS for Windows Sensors
This section describes two ways by which you can enable FIPS 140-2 for Carbon Black EDR
Windows sensors.
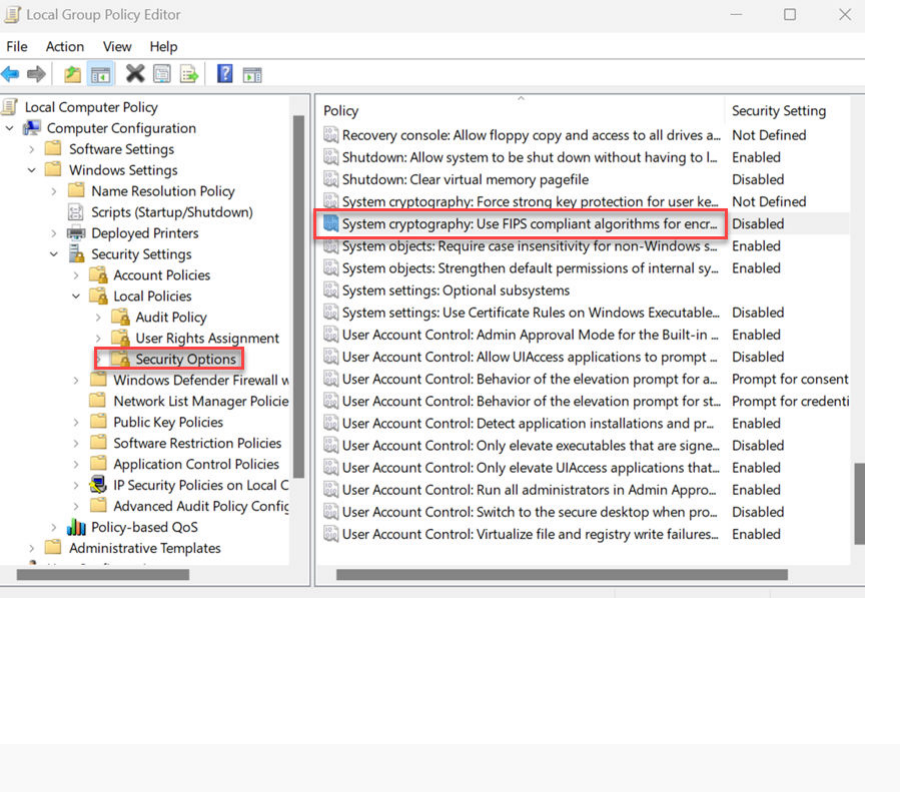
Enable FIPS for Windows Sensors through Group Policy Settings
To enable FIPS 140-2 for Carbon Black EDR Windows sensors by using Group Policy settings,
perform the following procedure.
Procedure
1 On the Windows endpoint, open the Group Policy Editor.
2 Go to Computer Configuration\Windows Settings\Security Settings\Local Policies\Security
Options.
3 Enable System cryptography by using FIPS-compliant algorithms for encryption, hashing, and
signing settings.
4 Reboot the endpoint.
5 Install the Carbon Black EDR Windows Sensor kit. See Install Windows Sensors on Endpoints.
6 Verify whether FIPS is enabled by running the following command:
C:\>reg query HKLM\System\CurrentControlSet\Control\Lsa\FipsAlgorithmPolicy
Carbon Black EDR Sensor Installation Guide
VMware by Broadcom 11

The output should read as follows:
HKEY_LOCAL_MACHINE\System\CurrentControlSet\Control\Lsa\FipsAlgorithmPolicy Enabled
REG_DWORD 0x1
7 Open the sensor.log file and check whether the Windows system-wide FIPS mode is
enabled log is available.
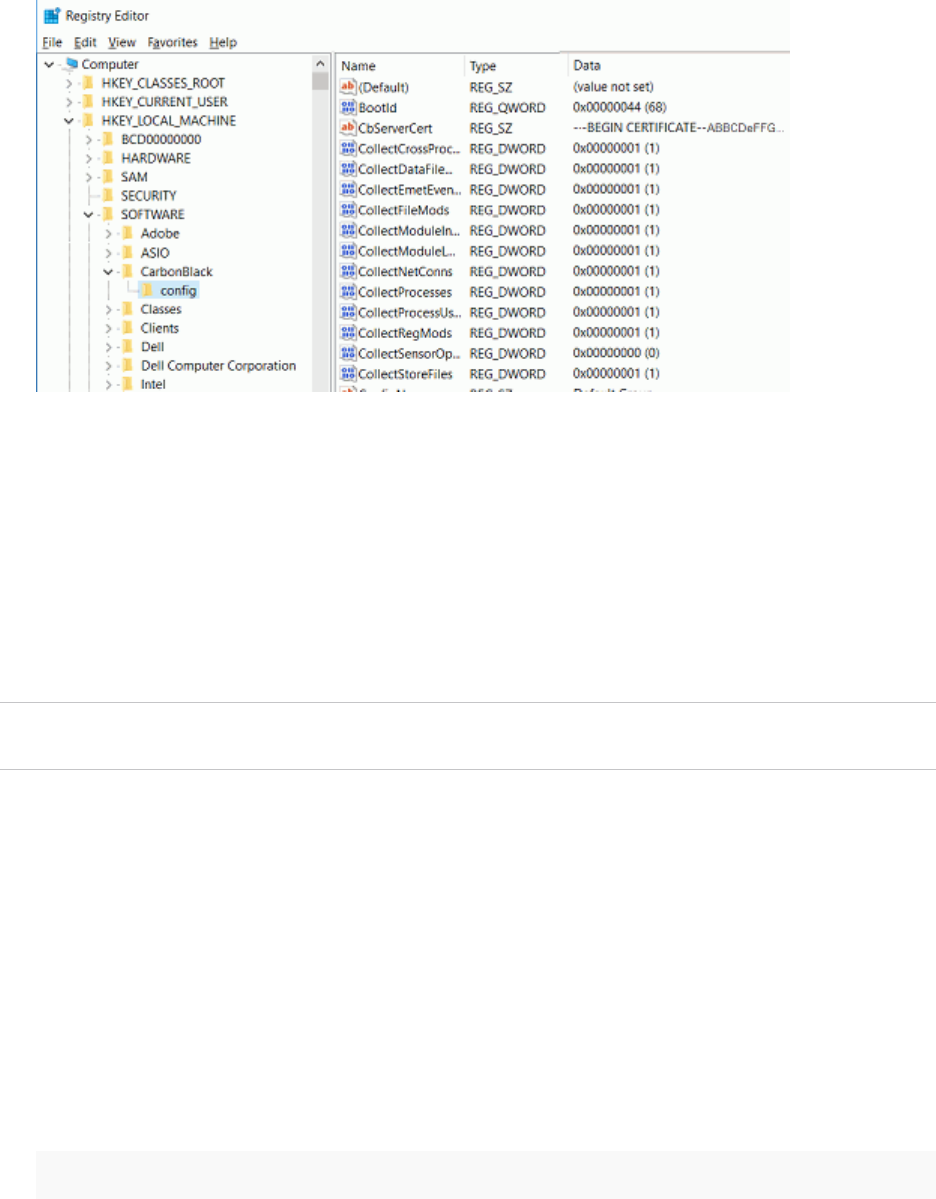
Enable FIPS for Windows Sensors through the Registry
To enable FIPS 140-2 for Carbon Black EDR Windows sensors through the registry, perform the
following procedure.
Procedure
1 On the Windows endpoint, open the Windows Registry Editor.
2 Go to HKLM\System\CurrentControlSet\Control\Lsa\FipsAlgorithmPolicy\Enabled and set
Enabled to 1.
3 Reboot the endpoint.
4 Install the Carbon Black EDR Windows Sensor kit. See Install Windows Sensors on Endpoints.
5 Verify whether FIPS is enabled by running the following command:
C:\>reg query HKLM\System\CurrentControlSet\Control\Lsa\FipsAlgorithmPolicy
The output should read as follows:
HKEY_LOCAL_MACHINE\System\CurrentControlSet\Control\Lsa\FipsAlgorithmPolicy Enabled
REG_DWORD 0x1
6 Open the sensor.log file and check whether the Windows system-wide FIPS mode is
enabled log is available.
Install Windows Sensors on Endpoints
Use the following procedure to install Carbon Black EDR Windows sensors on endpoints.
Procedure
1 In the Carbon Black EDR console, on the navigation bar, click Sensors.
2 In the Groups panel, select the sensor group for the new sensor to join.
The Download Sensor Installer drop-down list appears.
3 From the Download Sensor Installer list, select one of the following to download a ZIP file
that contains the package installer:
n To install a single sensor only, select either Windows Standalone EXE - Latest Version or
Windows Standalone EXE - <
specific version
>.
Carbon Black EDR Sensor Installation Guide
VMware by Broadcom 12

n To install one or more sensors, select Windows MSI for GPO Installation - Latest Version
or Windows MSI for GPO Installation - <
specific version
>.
where <
specific version
> is the sensor version that the group’s upgrade policy specifies
for automatic updates. This method is useful for bringing on a new host and installing the
same sensor version group-wide.
4 For a standalone installation, do the following:
a Copy the downloaded <
install package name
>.zip file to the Windows endpoint.
b Extract the contents of the <
install package name
>.zip file to a temporary folder.
c Double-click the file CarbonBlackClientSetup.exe and follow the installation prompts.
5 For the Windows MSI for GPO installation, follow the instructions in the GPO_README.txt file,
which is included in the downloaded <
install package name
>.zip file.
Results
After the installation is complete, the Windows sensor is installed and running. The Sensors page
in the
Carbon Black EDR console shows the sensor as registered and checking into the Carbon
Black EDR server.
Configure Proxy Settings for Windows Sensors Versions
6.2.3 and Later
This topic describes how to configure HTTP proxy settings for Carbon Black EDR Windows
sensors version 6.2.3 and later.
Procedure
1 Set the proxy configuration string in Sensorsettings.ini to the following values (case
sensitive):
a “Proxy=@wpad”: Instructs the sensor to use the WPAD protocol to autodetect the proxy
settings. If autodetection fails, a direct connection is used. This is done for every request
that the sensor needs to make.
b “Proxy=@pacurl:URL”, where
URL
is the URL of a PAC file. This instructs the sensor to
download the PAC file at this URL, and to use the proxy that it configures for the current
networking conditions and requests. If the PAC file cannot be found, a direct connection
is used. This is done for every request that the sensor makes.
c “Proxy=server:port”: This setting was supported in previous sensor versions; however,
the behavior is enhanced. If communications fail with a DNS resolution failure or fails to
connect to the server, a direct connection is attempted. Note that an HTTP failure (status
code other than 200 OK) does not trigger a direct connection.
Note There is no server-side user interface to set this configuration option. The server
cannot inform the sensor of this configuration via the Protobuf message.
Carbon Black EDR Sensor Installation Guide
VMware by Broadcom 13

2 Alternatively, for installed sensors, you can set the registry value
“HKLM\SOFTWARE\CarbonBlack\config\Proxy” to the desired string (type REG_SZ). For
example: “reg add HKLM\SOFTWARE\CarbonBlack\config /v Proxy /t REG_SZ /d @wpad”. It
is recommended to use either
"@wpad" or "@pacurl:URL", depending on your configuration.
Configure Proxy Settings for Windows Sensors Versions
Prior to 6.2.3
This topic describes how to configure HTTP proxy settings for Carbon Black EDR Windows
sensors version prior to 6.2.3.
For Windows sensors versions prior to 6.2.3, proxies are supported in the following way:
Procedure
u In the Sensorsettings.ini file, set a configuration string “Proxy=server:port”.
Server
can
be the host name or IP address of a proxy server, and
port
is an optional numerical port
value.
Note There is no server-side user interface to set this configuration option. The server
cannot inform the sensor of this configuration via the Protobuf message.
Carbon Black EDR Sensor Installation Guide
VMware by Broadcom 14
Installing macOS Sensors on
Endpoints
3
This section describes how to install Carbon Black EDR macOS sensors on endpoints.
Read the following topics next:
n Granting macOS Sensor v7.0+ Access on macOS v11.0+ Big Sur
n Install macOS Sensors on Endpoints
Granting macOS Sensor v7.0+ Access on macOS v11.0+ Big
Sur
As part of the transition to system extensions in macOS 11.0 and later versions, you must approve
the new system extension and network filtering and allow Full Disk Access.
For example, this process is similar to kernel extension approval, which was added in macOS
10.13.
This process does not replace the kernel extension approval process for running the Carbon
Black EDR sensor on macOS versions prior to 11.0.
To be completely effective, the Carbon Black EDR macOS sensor must get approval for the
system extension, network filtering, and Full Disk Access. You can accomplish this manually
on each endpoint, or for quicker and more consistent endpoint management, you can manage
these settings across your organization through the creation and deployment of a mobile device
management (MDM) profile.
Manually Approve the System Extension and Network Filtering
If the System Extension is not pre-approved by MDM (recommended), you can manually approve
System Extensions locally after you upgrade the OS.
Procedure
1 On an endpoint running macOS 11 Big Sur, install the sensor on the endpoint and then go to
the General tab in the Security & Privacy pane in System Preferences.
2 Authenticate as an administrator. Click the Allow button next to the
System software from
application es-loader was blocked from loading
message.
VMware by Broadcom
15

3 Click the Allow button in the
es-loader Would Like to Filter Network Content
window.
Results
The installer will finish running and load.
Approving the System Extension with MDM
Carbon Black EDR recommends submitting the applicable Carbon Black EDR System Extension
IDs for approval by MDM before installing or upgrading to macOS 11 Big Sur.
Note These instructions were created by using Apple documentation and ProfileCreator. Field
names, values, and functionality can vary depending on the MDM framework or sensor version
used.
The following configuration creates the correct mobileconfig in your MDM. Specify the Apple
Team ID and System Extension bundle Identifier in your Allowed System Extension configuration
profile:
System Extension Types: Allowed System Extensions
Apple Team ID: 7AGZNQ2S2T
System Extension Bundle ID: com.carbonblack.es-loader.es-extension
Approving Network Filtering with MDM
Carbon Black EDRk recommends that you approve the Carbon Black Network Extension
Component of the System Extension via MDM. You can grant the System Extension the ability
to Filter Network Content through a Web Content Filter configuration profile.
Note These instructions were created by using Apple documentation and ProfileCreator. Field
names, values, and functionality can vary depending on the MDM framework or sensor version
used.
After creating this profile, the profile should be signed to enable distribution via MDM. Complete
the following fields exactly as shown here. Copy and paste for accuracy.
General payload:
n Payload Scope:
System
Web Content Filter payload:
n Filter Type:
Plug-In
Carbon Black EDR Sensor Installation Guide
VMware by Broadcom 16

n Plug-In Bundle ID:
com.carbonblack.es-loader
n Check Enable Socket Filtering Filter Data Provider System Extension Bundle ID (macOS):
com.carbonblack.es-loader.es-extension
n Check Enable Socket Filtering Filter Data Provider Designated Requirement (macOS):
identifier "com.carbonblack.es-loader.es-extension" and anchor apple generic
and certificate 1[field.1.2.840.113635.100.6.2.6] /* exists */ and certificate
leaf[field.1.2.840.113635.100.6.1.13] /* exists */ and certificate leaf[subject.OU] =
"7AGZNQ2S2T"
Check Enable Packet Filtering (macOS):
n Filter Packet Provider System Extension Bundle ID (macOS):
com.carbonblack.es-loader.es-extension
n Filter Packet Provider Designated Requirement (macOS):
identifier "com.carbonblack.es-loader.es-extension" and anchor apple generic
and certificate 1[field.1.2.840.113635.100.6.2.6] /* exists */ and certificate
leaf[field.1.2.840.113635.100.6.1.13] /* exists */ and certificate leaf[subject.OU] =
"7AGZNQ2S2T"
Granting the Sensor Full Disk Access
For the Carbon Black EDR macOS sensor to operate at full functionality on an endpoint running
macOS 11 Big Sur, the system extension must have Full Disk Access on the endpoint.
Manually Grant the Sensor Full Disk Access
Follow this procedure to manually enable Full Disk Access on an endpoint that is running macOS
11 Big Sur.
Procedure
1 In the Security & Privacy System Preferences section, click the Privacy tab.
2 Authenticate as an administrator.
3 Scroll to Full Disk Access.
4 If it exists, approve the application es-extension.
Grant the Sensor Full Disk Access with MDM
Perform the following procedure to create and distribute the Privacy Preference payload in your
MDM for Full Disk Access.
Carbon Black EDR Sensor Installation Guide
VMware by Broadcom 17
Granting an application full disk access is accomplished via a Privacy Preferences payload. This
procedure adds two identifiers to the payload. Complete the fields exactly as documented here.
Copy and paste for accuracy.
Prerequisites
Note Field names, values, and functionality can vary depending on the MDM framework or
sensor version used.
Procedure
1 Set the following values:
Identifier:
com.carbonblack.CbOsxSensorService
Identifier Type:
Bundle ID
Code Requirement:
identifier "com.carbonblack.CbOsxSensorService" and anchor apple generic and
certificate 1[field.1.2.840.113635.100.6.2.6] /* exists */ and certificate
leaf[field.1.2.840.113635.100.6.1.13] /* exists */ and certificate leaf[subject.OU] =
"7AGZNQ2S2T"
App or Service:
SystemPolicyAllFiles
Access:
Allow
2 Press the plus (+) button to append an additional identifier.
Identifier:
com.carbonblack.es-loader.es-extension
Identifier Type:
Bundle ID
Code Requirement:
identifier "com.carbonblack.es-loader.es-extension" and anchor apple generic
and certificate 1[field.1.2.840.113635.100.6.2.6] /* exists */ and certificate
leaf[field.1.2.840.113635.100.6.1.13] /* exists */ and certificate leaf[subject.OU] =
"7AGZNQ2S2T"
Carbon Black EDR Sensor Installation Guide
VMware by Broadcom 18

App or Service:
SystemPolicyAllFiles
Access:
Allow
Install macOS Sensors on Endpoints
This article describes how to install Carbon Black EDR macOS sensors on endpoints.
Prerequisites
Note To install a sensors on macOS systems, you must have access to an administrator account.
To have access to the Download Sensor Installer controls for a sensor group, you must be one of
the following:
n A user that is a member of a team that has either the Viewer or Analyst role for the sensor
group.
n For Carbon Black EDR installations, a Global Administrator.
n For Carbon Black Hosted EDR installations, an Administrator.
Procedure
1 On the navigation bar of the Carbon Black EDR console, click Sensors.
2 In the Groups panel, select the sensor group for installing the sensor package.
3 From the Download Sensor Installer list at the top of the Sensors page, select OSX
Standalone PKG. The sensor package file is downloaded to your system.
4 In the operating system, do the following:
a Copy the <install package name>.zip sensor installation package to the macOS
endpoint.
b Extract the <install package name>.zip file to a temporary folder.
c From the extracted .zip file, double-click the .pkg file and follow the installation
prompts. You can also launch the .pkg file by using a silent installer. For example:
installer -pkg <install package name>.pkg -target /
This installs the macOS sensor using the configuration that is provided in the
sensorsettings.ini file.
Carbon Black EDR Sensor Installation Guide
VMware by Broadcom 19
Results
After the installation is complete, the macOS sensor is installed and running. The Sensors page
in the Carbon Black EDR console shows the sensor as registered and checking into the Carbon
Black EDR server.
Carbon Black EDR Sensor Installation Guide
VMware by Broadcom 20
Installing Linux Sensors on
Endpoints
4
This section describes how to install Carbon Black EDR Linux sensors on endpoints.
Read the following topics next:
n Prerequisites for Linux 4.4+ Kernels for Linux Sensor Versions 2.10+
n Verify Linux 7.1+ Install Files
n Install Linux Sensors on Endpoints
n Enable FIPS 140-2 for Linux Sensor 7.3.0+
Prerequisites for Linux 4.4+ Kernels for Linux Sensor
Versions 2.10+
Prior to installing the sensor, the underlying BPF implementation requires the Linux kernel
headers for the active kernel to be installed. This is relevant if you install the sensor on BPF
system without using the install script.
Run the command cat /boot/config-$(uname -r) | grep CONFIG_IKHEADERS. If the result is
CONFIG_IKHEADERS=m or CONFIG_IKHEADERS=y, then no header package needs to be installed.
You can check the running kernel version by running the following command: $ uname -r
For CentOS, RHEL, Oracle RHCK or Amazon Linux
n To check whether the kernel headers are installed (any user can run this):
$ yum list kernel-devel-$(uname -r)
n To install the necessary kernel headers:
$ sudo yum install -y kernel-devel-$(uname -r)
n When properly installed, the required kernel headers are located under
$ /usr/src/kernels/$(uname -r)/include/
If the kernel headers package cannot be found
VMware by Broadcom
21
Linux distributions regularly update the kernel package and might not keep the old kernel
headers package in their package repos. If this happens, the easiest solution is to update the
system to the latest kernel and then rerun the kernel headers install command.
To update the kernel to the latest version and install kernel headers, run the following commands
(this requires a reboot):
$ sudo yum update kernel kernel-devel
$ reboot
For SUSE or OpenSUSE
n To check whether the kernel headers are installed (any user can run this):
$ zypper se -s kernel-default-devel | grep $(uname -r | sed “s/-default//”) $
zypper se -s kernel-devel | grep $(uname -r | sed “s/-default//”)
n The output should be like the following, where the i+ signifies that the package is installed. If
the left-hand column is v or is blank, the package must be installed.
$ i+ kernel-default-devel | package | 4.12.14-lp150.12.25.1 | x86_64 | openSUSE-
Leap-15.0-Update
n To install the necessary kernel headers:
$ zypper install --oldpackage kernel-default-devel=$(uname -r | sed “s/-default//”)
$ zypper install --oldpackage kernel-devel=$(uname -r | sed “s/-default//”)
n When properly installed, the required kernel headers are located under
$/usr/src/linux-$(uname -r) | sed “s/-default//”)/include/ | grep -f
For Debian
n To check whether the kernel headers are installed (any user can run this):
apt list linux-headers-$(uname -r)
n To install the necessary kernel headers:
sudo apt install linux-headers-$(uname -r)
n When properly installed, the required kernel headers are located under
/usr/src/linux-headers-/$(uname -r)/include/
For Ubuntu
n To check whether the kernel headers are installed (any user can run this):
apt list linux-headers-$(uname -r)
n To install the necessary kernel headers:
sudo apt install linux-headers-$(uname -r)
Carbon Black EDR Sensor Installation Guide
VMware by Broadcom 22

n When properly installed, the required kernel headers are located under
/usr/src/linux-headers-$(uname -r)/include/
Verify Linux 7.1+ Install Files
The Linux 7.1+ sensor includes the ability to verify the sensor install files before the sensor
installation.
Manifest files are added as part of CarbonBlackClientSetup-linux-<version>.tgz
and CarbonBlackSensorUpgrader-linux-<version>.tar.gz. These packages come with
manifest.sha256 and manifest.sha256.asc.
Procedure
1 Copy the following text to a file named public.asc:
-----BEGIN PGP PUBLIC KEY BLOCK-----
Version: GnuPG v2.0.14 (GNU/Linux)
mQENBFMsJ4kBCACp93MIPVj1NVY7HEZm+gFtRU7lihQr+7lYIXCL59nXSaoniI/T
eihTlGTjWoJ7fTqzstA2Syt+Mmq7VecOVoR0mJgBjw1CFXlzApZI1tTnq9Iio6Xs
2fxP08n1kKXQFlG7x62Y7EjJaFAF1fcMVrHPc43CTM455tRW9V5ODETGyt9DByf3
R2w11NZgGUzonElwIKib2zUJ+XSIvIU5Go60t+BDfmJMdTtAxoyZ79b+sTl//lcq
Be0WhSX48Fn6CfFzeH84/lCPcf/i1MB5qE9Vjk6iR2Z9M4xB1YKGUZT/Z1L9yurt
bs3tpp5kSajgYrkCYaYkHY/so+E01zbQa99vABEBAAG0JWJpdDlidWlsZCAoYml0
OWNzKSA8c3VwcG9ydEBiaXQ5LmNvbT6JATgEEwECACIFAlMsJ4kCGwMGCwkIBwMC
BhUIAgkKCwQWAgMBAh4BAheAAAoJEEhbsN9qxXcER9IH/i8dg4q4cK1lLLFr8vEi
30Il/kokNCacNdBH0gPVlCiGaVRcmgC1pAZuO8HjyEhFplrWU7rRPFhdLgupN95I
rFY5CJ9r+FO99SJTkhJY7vM/4rSOVTat+ZAJgJ/lk3Q148jUK+vOhKa/9I2lys5N
g7OR0EST7fLBNigKIXgy44Zb5GjzJBAQ1vbGNuErduldrR4lIueFjk6QdbVp8SN1
kD/SgqH1rmBiCeX2YMFcudDT6YQ7DnKfzC+GtKp+Lbs2ZyYH96bIeSNKA008x95f
y0dWEsxYvrsoAvl9zIml5mg2mnLHNXiDV54ABvtPk27TKeZBxlQPWBu3TZCmNkdn
umy5AQ0EUywniQEIALtfcwslAk9pyfgj0GqznkalLrln8KsznYAtUCQUl8odtHLP
QW4puA713glzLLk+IU69SFUHYdUIl0I2VP3M9gRWuQQ7NNXaniPXF0xTCrLPPYH7
Y4d7VlK7q/Fu+qP+pobT9RV9Z0hINmm5mYeeNneCqWzFdmdOYqMp592gdqsKA9E6
M70jSZzYbL9ZVCENiCM11q+CqciddZkAN0MrOP78w7sMXpQiJ6oRTBDy43GcHf1Z
BwClePknHQ1tXrCxY4nS/+nbhNgx5U0CtZMk034Cj75+Auyen2sbsgFj889Gjxoj
SzZ2elWzKbjiC9sZJjI++ENDsH79Vi84u98tplMAEQEAAYkBHwQYAQIACQUCUywn
iQIbDAAKCRBIW7DfasV3BBYBCACMw7aKV2vsVVVQ8GSfe6gjnR5iYc+aoFpoMSRf
5keGk0Tw1s7Qx1H4CEJTBJRuSol+KHKkR+S2rqc3FfU97WnODx3xPIZlguL2+MUi
LENm8W37QIr3G3vC7Lxens+67Fr367P0clC7irJxo6I8s5R//eiUaU5y3CzrTYOz
eyS3ZaG3Bmax7EinfR0kcdGE0PuKEJ+qUPoOQPEDgqnwCrPtxou7ihzGPbWg75en
Carbon Black EDR Sensor Installation Guide
VMware by Broadcom 23

B6HS7k++N1yRGXQwRKlP2XHZjCUpkcFHZJQJwDpnphTqq+2DqJ89+wBf2cvKCfgO
v7EXr1qie7DcHDHpc1M7ZcSCqTCjbrQTb6KetUJK+WM/Uotx
=0gTd
-----END PGP PUBLIC KEY BLOCK-----
Note Starting with the 7.3.2 Linux sensor release, the sensor uses a new SHA-256 public key:
-----BEGIN PGP PUBLIC KEY BLOCK-----
mQENBGM2sKsBCACla33AUuizphrW5FpPpJR7Wrb9rL+Yd8srYxAJw43vyE77jkHB
Umk/lOo17+LhLd8K0cnqlNXuIODNJ2YGQgIEJlfjVLpSL6Yva4GZlh/Y9PvPJGt9
YatvBkNXmNcqCteRP1JpADyFPAExvUKqBealEIbeS59GzcsOyhD4ohRZeUCH6Uuw
+FWv91x/9AGPufu4mFnRw9WYy9tlxOfbPd/pd0uCzVQL1ygsJyUC8yOYLYZzLgmB
YPH9djasoMNc+qnaP801DT7gjwj9KDPP/VLpDJkSJppfSc9JwnXyGbcF7ccRCmkh
IdZsP/CvyfA5zBOsXDRTtC7dR88ECRdOUxQXABEBAAG0LWJ1aWxkIChjYXJib25i
bGFjaykgPGNvbnRhY3RAY2FyYm9uYmxhY2suY29tPokBUgQTAQgAPBYhBDVnau5F
L5GmDS9KQ+eJLs39xQnGBQJjNrCrAhsDBQsJCAcCAyICAQYVCgkICwIEFgIDAQIe
BwIXgAAKCRDniS7N/cUJxg2RB/9i1tuVyuDk1DuHF4lpywjwYEPYEVssFa3yjR9s
9g2P4hkBXyllifvxzp+X4JdYOa0xQhyblP0kj8QEw90ZAGcx9J+dAUF1iCtTr1DT
VghKIQh+vjYrkprxC9TmHluTGezeaLKhV/c99U+FypKMBc4t5i5QFBnFAC9RMiI4
DW0QCv4lSpZnJR1uaE1IbnuyijuDHuANXSg87FnqKxNG6s765N6FrJc44GjZG0Qu
tiaW1KmuvojjUJaxO6kr5SmlOyGJKItqqdLa8CDGKPwTV4pYbH902hgS9F4lBgB6
1YuarV6D79tpqV/TejUhdwaD/apMW7UrnPK4IBtW9mKGBzOK
=9B9E
-----END PGP PUBLIC KEY BLOCK-----
Linux sensors 7.3.2 and greater use only the SHA-256 public key, not the former SHA-1 key.
Older sensor versions continue to use the SHA-1 key.
2 Issue the following command to generate public.asc.gpg, which will be used to verify
manifest files.
gpg --dearmor public.asc
3 To verify the included manifest.sha256 file with the public key, perform the following step.
This step creates a trustdb.gpg file, which can be safely ignored.
Note In the following example output, the "Good signature" line validates the manifest. The
WARNING lines can be ignored. The Signature date is the TGZ signing date.
$ gpg --no-default-keyring --homedir . \
--keyring public.asc.gpg \
--verify manifest.sha256.asc manifest.sha256
Example output:
gpg: WARNING: unsafe permissions on homedir '/tmp/cb-psc-install'
gpg: Signature made Wed Jun 9 01:49:05 2021 IST
gpg: using RSA key 485BB0DF6AC57704
gpg: /tmp/cb-psc-install/trustdb.gpg: trustdb created
Carbon Black EDR Sensor Installation Guide
VMware by Broadcom 24
gpg: Good signature from "bit9build (bit9cs) <[email protected]>" [unknown]
gpg: WARNING: This key is not certified with a trusted signature!
gpg: There is no indication that the signature belongs to the owner.
Primary key fingerprint: 1853 62D1 D591 FDFA 0C64 7B58 485B B0DF 6AC5 7704
4 Check the integrity of the unpacked files: $ sha256sum -c manifest.sha256
blades/bladesUnpack.sh: OK
blades/cb-psc-lq-0.9.8200-8200-blade.tar.gz: OK
blades/cb-psc-th-0.9.8200-8200-blade.tar.gz: OK
cb-psc-sensor-2.11.2-545096.el6.x86_64.rpm: OK
cb-psc-sensor-2.11.2-545096.el7.x86_64.rpm: OK
cb-psc-sensor-2.11.2-545096.el8.x86_64.rpm: OK
install.sh: OK
5 Check for unexpected files extracted from the TGZ. You should see the files listed in
the verified manifest.sha256, public.asc, public.asc.gpg, trustdb.gpg, and the two
manifest files. The existence of additional files in the directory indicate that the TGZ was
tampered.
Install Linux Sensors on Endpoints
This article describes how to install the Carbon Black EDR Linux sensor on an endpoint.
Prerequisites
Important Before you install the 7.1.+ Linux sensor, see Chapter 6 Downgrading Carbon Black
EDR Linux Sensors.
Note To install sensors on Linux systems, you must be a root user or have “sudoer” permissions
and run the installer with “sudo”.
You must have the following requirements before installing the sensor:
n Carbon Black EDR server version 5.0 or higher
n OpenSSL version 1.0.1 or higher
To have access to the Download Sensor Installer controls for a sensor group, you must be one
of the following:
n A user that is a member of a team that has either the Viewer or Analyst role for the sensor
group.
n For Carbon Black EDR installations, a Global Administrator.
n For Carbon Black Hosted EDR installations, an Administrator.
Procedure
1 On the navigation bar, click Sensors.
Carbon Black EDR Sensor Installation Guide
VMware by Broadcom 25

2 In the Groups panel, select the sensor group for which you want to install the sensor
package.
3 From the Download Sensor Installer drop-down list, select Linux Standalone RPM. The
sensor package file is downloaded to your system.
4 In the operating system, do the following:
a Copy the <install package name>.tar.gz sensor installation package to the Linux
endpoint.
b Untar the <install package name>.tar.gz file to a temporary folder.
For example, at a command prompt and from the directory where the file is installed, run
this command:
tar -zxvf <install file name>.tar.gz
c From the extracted .tar.gz file, run the .sh file and follow the installation prompts. This
installs the Linux sensor using the configuration provided in the sensorsettings.ini
file.
Results
After this process is complete, the Linux sensor is installed and running. The Sensors page in the
Carbon Black EDR console shows the sensor as registered and checking into the Carbon Black
EDR server.
Enable FIPS 140-2 for Linux Sensor 7.3.0+
To enable FIPS 140-2 for Linux sensors 7.3.0+, perform the following procedure.
The following is an example of how to enable FIPS 140-2 mode on a RHEL 8 or 9 system.
Prerequisites
Confirm that FIPS 140-2 mode is enabled on the system. The sensor will automatically adopt the
system-wide FIPS mode. There is no distinct sensor configuration to enable or disable FIPS.
Procedure
1 Login as root and run the following command:
fips-mode-setup -–check
The following message displays if FIPS mode is enabled:
FIPS mode is enabled.
2 If FIPS is not enabled, run the following command:
fips-mode-setup -–enable
Carbon Black EDR Sensor Installation Guide
VMware by Broadcom 26

3 Reboot the endpoint.
4 Rerun the following command:
fips-mode-setup -–check
Confirm that the following message displays:
FIPS mode is enabled.
Carbon Black EDR Sensor Installation Guide
VMware by Broadcom 27

Upgrading Carbon Black EDR
Sensors
5
A new release of Carbon Black EDR Server can include a new sensor version. Check the server
release notes to confirm if a new sensor version is available. Decide if you want to deploy the
updated sensor immediately to existing sensor installations, or only install it where there has not
been a sensor before.
Note Carbon Black strongly recommends that you upgrade your sensors as soon as possible
when a new version is available. However, you should not upgrade all sensors simultaneously if
you have a large number of sensors, due to potential performance issues.
If you want to use automatic upgrades, consider gradually enabling automatic upgrades one
sensor group at a time.
Sensor upgrades might require a reboot.
To upgrade a sensor using the Carbon Black EDR console, you must be one of the following:
n A user that has the Analyst role for the sensor group for the endpoint.
n For Carbon Black EDR installations, a Global Administrator.
n For Carbon Black Hosted EDR installations, an Administrator.
In addition, you must have the following privileges depending on the operating system of the
endpoint:
n For Windows endpoints, you must be a member of the local administrator group.
n For macOS endpoints, you must have access to an administrator account.
n For Linux endpoints, you must be a root user or have “sudoer” permissions and run the
installer with “sudo”.
Each sensor group has an upgrade policy that determines how and when the sensors in the
group are updated, and to what version. You set the upgrade policy for a sensor group in the
Create or Edit Group panel of the Sensors page.
Upgrade policy options are as follows:
n Manually update sensors at the time of your choice using the Download Sensor Installer
menu.
n Automatically upgrade sensors to the latest version.
VMware by Broadcom
28
n Update sensors to a specific version.
See “Sensor Groups” in the
Carbon Black EDR User Guide
for a description of the upgrade policy
options for a sensor group.
Carbon Black EDR Sensor Installation Guide
VMware by Broadcom 29
Downgrading Carbon Black EDR
Linux Sensors
6
This article describes scenarios and requirements for downgrading Carbon Black EDR Linux
sensors.
The following scenarios are edge cases where a normal downgrade process will not work.
n Downgrades from 7.0.0-lnx to 6.x.x-lnx require a manual uninstall and reinstall due to
extensive architectural changes in the 7.0.0 version.
n Downgrades from 7.1.0-lnx on systems running with kernel version greater than 4.x to any
sensor version will need a manual cleanup of 7.1.0-lnx packages.
n Downgrades from 7.1.0-lnx on systems running with kernel version less than 4.x to any sensor
version require a manual uninstall and reinstall due to extensive architectural changes on
7.1.0-lnx version.
VMware by Broadcom
30
Uninstalling Carbon Black EDR
Sensors
7
To uninstall Carbon Black EDR sensors, you can either use the Carbon Black EDR console or
manually uninstall them on the endpoint.
Read the following topics next:
n Uninstall Sensors through the Console
n Uninstall Windows Sensors Directly on Endpoints
n Uninstall macOS Sensors Directly on Endpoints
n Uninstall Linux Sensors Directly on Endpoints
Uninstall Sensors through the Console
For all supported operating system platforms, you can uninstall sensors by using the Carbon
Black EDR console. After you uninstall sensors, they will stop reporting events and binaries from
the endpoints on which they are installed to the Carbon Black EDR server.
Prerequisites
To uninstall a sensor using the Carbon Black EDR console, you must be one of the following:
n A user that has the enhanced Analyst permission for uninstalling sensors and is a member of
a team that has the Analyst role for the sensor group for the endpoint.
n For Carbon Black EDR installations, a Global Administrator.
n For Carbon Black Hosted EDR installations, an Administrator.
Procedure
1 On the navigation bar, click Sensors.
2 In the Groups panel, select the sensor group that contains the sensor to uninstall.
3 In the sensors list, select the checkbox next to the sensor(s) to uninstall.
4 From the Actions drop-down menu, select Uninstall.
VMware by Broadcom
31

5 In the Uninstall Sensors Confirmation dialog box, click Okay to confirm the uninstall action.
Note The sensor receives the uninstall request the next time it checks in with the server,
which can be anytime between 30 seconds to several minutes depending on the number of
active sensors and the server load. Uninstalled sensors do not appear in sensor and host lists,
unless Uninstalled Sensors is selected.
Uninstall Windows Sensors Directly on Endpoints
You can use the following procedures to directly uninstall Carbon Black EDR Windows sensors on
endpoints.
Prerequisites
You must be in the Local Administrators permissions group or higher to manually uninstall the
sensor.
Procedure
u Choose one of the following methods to uninstall the Windows sensor:
n Run the uninstall file in the %windir%/CarbonBlack/ directory.
n In Windows, open Control Panel > Add/Remove Programs and use the Windows
application uninstall feature.
Uninstall macOS Sensors Directly on Endpoints
You can use the following procedures to directly uninstall Carbon Black EDR macOS sensors on
endpoints.
Prerequisites
You must have access to an administrator account or be assigned to an Analyst team that has
uninstall sensor privileges for the appropriate sensor group.
Procedure
u On the macOS endpoint where the sensor is installed, run the following command:
/Applications/CarbonBlack/sensoruninst.sh
After this process is complete, the endpoint stops reporting events and binaries to the
Carbon Black EDR server and all caching information for logs is deleted.
Uninstall Linux Sensors Directly on Endpoints
You can use the following procedures to directly uninstall Carbon Black EDR Linux sensors on
endpoints.
Carbon Black EDR Sensor Installation Guide
VMware by Broadcom 32

Prerequisites
You must be a root user or have “sudoer” permissions and run the installer with “sudo”.
Procedure
1 If you are running Linux sensor 6.2 or later, run the following command:
/opt/carbonblack/response/bin/sensoruninstall.sh
2 If you are running a version of the Linux sensor that is earlier than 6.2, run the following
command:
/opt/cbsensor/sensoruninstall.sh
When this process is complete, the endpoint stops reporting events and binaries to the
Carbon Black EDR server.
Carbon Black EDR Sensor Installation Guide
VMware by Broadcom 33
Troubleshooting Carbon Black
EDR Sensor Installations
8
This section describes ways to troubleshoot Carbon Black EDR sensors. See also “Sensor Health
Score Messages” in the
Carbon Black EDR User Guide
.
Read the following topics next:
n Troubleshooting Windows Sensor Installations
n Troubleshooting macOS Sensor Installations
n Troubleshooting Linux Sensor Installations
Troubleshooting Windows Sensor Installations
This section describes how to troubleshoot Windows sensor installation errors.
n Confirm that the %WINDIR%\CarbonBlack\ directory exists. Carbon Black EDR should be
installed in this directory.
n Confirm that the %WINDIR%\CarbonBlack\InstallLogs\ directory contains installation logs.
Review the latest log file for errors.
n Confirm that the current sensor log exists and review it for errors: %WINDIR%
\CarbonBlack\Sensor.log.
n Confirm the settings in the registry key at HKLM\Software\CarbonBlack\Config. A typical
configuration looks like the following:
VMware by Broadcom
34
Generate and Send Windows Sensor Diagnostic Data Logs
You can collect diagnostic data logs using the sensordiags.exe tool.
Each collection overwrites the previous collection. If you must collect multiple diagnostics, move
the current collection to a directory that is outside the C:\Windows\CarbonBlack\Diags path.
If the server has diagnostic collection enabled under Shared Settings, the sensor automatically
sends any logs from C:\Windows\CarbonBlack\diags\. If the upload succeeds, they are
deleted locally.
Note If tamper protection is enabled on the endpoint, see Use Carbon Black Live Response to
Collect Windows Sensor Diagnostic Logs with Tamper Protection Enabled.
Prerequisites
Requirements:
n Carbon Black EDR Windows sensors 6.2.2 and later
n Microsoft .NET 4.5 and later
Procedure
1 Open a command prompt window as Administrator.
2 Change directory to C:\Windows\CarbonBlack.
3 Run the diagnostic tool:
sensordiag.exe --type CDE
Where type is:
n C: Crash - Returns crash reports for Carbon Black user-mode service.
Carbon Black EDR Sensor Installation Guide
VMware by Broadcom 35
n D: Diagnostics - Returns information about the sensor. Includes the contents of all
subfolders of C:\Windows\CarbonBlack, and install information and metadata about the
sensor driver status.
n E: Environment - Collects system-wide information through WMI queries.
Command line switches:
n -type This is the only mandatory parameter. Must be some combination of C,D, and E. For
example:
sensordiag --type CE
n -startdate yyyy-mm-dd [hh:mm:ss] Only collects logs modified after a certain date/time.
For example: sensordiag --type CE --startdate 2019-02-04 09:00:00
n -enddate yyyy-mm-dd [hh:mm:ss] Only collects logs modified before a certain date/time.
This parameter can be used in conjunction with the startdate parameter. Example:
sensordiag --type CE --enddate 2019-02-10
n -remember Only collects logs modified since the last sensordiags was run. You cannot
use startdate or enddate together with remember. Example: sensordiag --type CDE
-remember
n -output C:\path\to\diag - Set the output directory to an alternative to the working
directory.
4 Collect the C:\Windows\CarbonBlack\diags\<filename>.zip file.
5 Send the diagnostic files to Broadcom Carbon Black Support using CBVault.
Collect Windows Sensor Diagnostic Logs with Tamper Protection
Enabled
This topic describes how to collect diagnostics for Carbon Black EDR Windows sensors in a
sensor group that has Tamper Protection enabled.
Requirements:
n Carbon Black EDR Windows sensors: 7.2.0 and later
n Microsoft .NET 4.5 and later
Use Carbon Black Live Response to Collect Windows Sensor Diagnostic Logs
with Tamper Protection Enabled
You can use Carbon Black Live Response to collect diagnostics for Carbon Black EDR Windows
sensors in a sensor group that has Tamper Protection enabled.
Prerequisites
Requirements:
n Carbon Black EDR Sensors: 7.2.0 and later
n Microsoft .NET 4.5 and later
Carbon Black EDR Sensor Installation Guide
VMware by Broadcom 36

Procedure
1 Establish a Carbon Black Live Response session and enter the following command. Replace
<
username
> with your username.
execfg cmd.exe /c sensordiag -type CDE -output c:\users\<username>\desktop\
2 Collect the zip file from c:\users\<username>\desktop.
Use the Command Line to Collect Windows Sensor Diagnostic Logs with Tamper
Protection Enabled
You can use the command line on an endpoint to collect diagnostics for Carbon Black EDR
Windows sensors in a sensor group that has Tamper Protection enabled.
Prerequisites
Requirements:
n Carbon Black EDR Windows sensors: 7.2.0 and later
n Microsoft .NET 4.5 and later
Procedure
1 On the endpoint, open a command prompt window with administrator permissions.
2 Copy sensordiag.exe to a writable and executable path (replace <
username
> with your
username):
copy c:\windows\carbonblack\sensordiag.exe c:\users\<username>\desktop\
3 Run sensordiag.exe:
c:\users\<username>\desktop\sensordiag.exe -type CDE -output c:\users\<username>\desktop\
4 Collect the zip file from c:\users\<username>\desktop.
Troubleshooting macOS Sensor Installations
This section describes how to troubleshoot potential errors during a macOS sensor installation.
Verify macOS Sensor Installations
Use the following methods to verify macOS sensor installations.
The following is a list of key files that should be present if the macOS sensor installation is
successful:
Carbon Black EDR Sensor Installation Guide
VMware by Broadcom 37

Table 8-1. Key Files
Path Description
6.2.7-osx and earlier:
/Applications/CarbonBlack/CbOsxSensorService
6.3.0-osx and later:
/Applications/Vmware Carbon Black EDR/
Contents/MacOS/CbOsxSensorService
Sensor service
6.2.7-osx and earlier: /Applications/CarbonBlack/
sensoruninst.sh
6.3.0-osx and later:
/Applications/Vmware Carbon Black EDR/
Contents/Resources/sensoruninst.sh
Uninstall script
All sensor versions on macOS 10.x
/System/Library/Extensions/
CbOsxSensorNetmon.kext
Network monitor
All sensor versions on macOS 10.x
/System/Library/Extensions/
CbOsxSensorProcmon.kext
Process monitor
7.0.1-mac and later sensor versions on macOS 11.x
Run systemextensionsctl list
Output should contain
com.carbonblack.es-loader.es-
extension (1.0/1) es-extension [activated enabled]
User-mode monitor
6.2.6-osx and earlier:
/var/lib/cb/sensorsettings.ini
6.2.7-osx and later:
/var/root/Library/Preferences/
com.carbonblack.sensor-service.plist
Settings file
The installation process can fail if
sensorsettings.ini is not located in the same directory as
Installer.pkg.
If the installation does not complete successfully, the installer reverts all the changes made to
the system but leaves the cblog.log file intact. For troubleshooting, collect the installer log file
created at /var/log/cblog.log and send it to Carbon Black for assistance.
Log Communications to Troubleshoot macOS Sensor Installations
Create a communications log dump to help troubleshoot macOS sensor installation errors.
Procedure
1 Determine the PID of the Carbon Black EDR sensor:
ps -ax | grep CbOsxSensorService
Carbon Black EDR Sensor Installation Guide
VMware by Broadcom 38
2 Start the communications log dump by issuing the following command:
sudo kill -s USR2 <pid of CbOsxSensorService>
You can locate the log at /var/lib/cb/sensor_comms.log.
Each transaction has a HRESULT (see the
description at https://docs.microsoft.com/en-us/openspecs/windows_protocols/ms-erref/
0642cb2f-2075-4469-918c-4441e69c548a?redirectedfrom=MSDN), which can be one of the
following:
Table 8-2. HRESULT
Facility Number Description Error Code Value
203 OS level errors Maps to errno
25 HTTP errors HTTP error code
200 Curl errors
201 Curl form errors
Manually Start and Stop macOS Sensor Daemon
You can manually stop and start the sensor daemon service for troubleshooting purposes.
Procedure
u Open a terminal and issue the following commands:
sudo launchctl unload /Library/LaunchDaemons/com.carbonblack.daemon.plist
sudo launchctl load /Library/LaunchDaemons/com.carbonblack.daemon.plist
Determine macOS Sensor Version
You can determine the current Carbon Black EDR macOS sensor version by running this
command.
Procedure
1 For macOS sensors v6.2.7-osx and earlier, run the following command:
/Applications/CarbonBlack/CbOsxSensorService -v
2 For macOS sensors v6.3.0-osx and later, run the following command:
/Applications/VMware\ Carbon\ Black\ EDR.app/Contents/MacOS/CbOsxSensorService -v
Carbon Black EDR Sensor Installation Guide
VMware by Broadcom 39

Determine Server URL to Troubleshoot macOS Sensor Installations
This article describes how to determine the server URL that is being used by the Carbon Black
EDR macOS sensor.
Procedure
u Create a communication log and dump the contents of the generated log file.
The server URL appears at the top.
Initiate an Immediate macOS Sensor Check-in to the Carbon Black
EDR Server
For troubleshooting purposes, you can initiate an immediate macOS sensor check-in to the
Carbon Black EDR server.
You can run a command to dump and collect network event logs, cbdaemon log files, and
important sensor and system configurations that can help diagnose sensor issues. The files are
packaged up into a single compressed file that you can deliver to Carbon Black for analysis.
Procedure
u To dump communication and event tracking logs, open a terminal and issue the following
command:
sudo kill -s USR2 <pid of CbOsxSensorService>
Initiate a macOS Sensor Diagnostic Data Dump
You can run a command to dump and collect network event logs, cbdaemon log files, and
important sensor and system configurations that can help diagnose sensor issues. The files are
packaged up into a single compressed file that you can deliver to Carbon Black for analysis.
Procedure
u Open a terminal and issue the following command:
sudo kill -s USR2 <pid of CbOsxSensorService>
Using the Diagnostic Uploads Utility on macOS Sensors
Beginning with Carbon Black EDR server version 6.2.2 and macOS sensor version 6.2.0, a sensor
diagnostics tool can collect diagnostic data packages from the endpoint and upload them to a
cloud location for analysis, using the Carbon Black EDR server as an intermediary.
The collected data can help Carbon Black representatives troubleshoot crashes, performance
problems, or other situations in which you believe there is an issue with a sensor. This feature as
available on both on-premise and cloud servers. It is currently available only on the latest macOS
sensor.
Carbon Black EDR Sensor Installation Guide
VMware by Broadcom 40
There are three different categories of data that can be uploaded using this feature:
n Crash data (automatic or manual): This option returns crash reports for Carbon Black user-
mode Service and Sensor Diags. You can choose to package and upload crash data manually
or set it for automatic packaging and upload when there is a crash.
n Diagnostics data (manual): This option returns information about the sensor. The data
includes a sample of the Carbon Black user-mode Service, Carbon Black user-mode service
statistics, cblog.log (installer log), any diag files for Carbon Black user-mode service, system
log messages containing "Carbon Black" and all daemon log files. This can be useful for
situations in which, while there has not been a crash, other behavior suggests a problem in
sensor operations. This option must be run manually.
n Environment data (manual): This option returns a list of all open files, a list of all running
processes and the amount of CPU they are using, and computer information including Power-
On Self Test, Memory, System Software Version, Boot Device, Computer Name, User Name,
and a list of all kernel extensions. This option must be run manually.
Enable macos Sensor Diagnostics Uploads
To use the sensor diagnostic uploads feature, you first enable it through the Shared Settings
page in the Carbon Black EDR console.
Procedure
u In the Carbon Black EDR console, click Username>Shared Settings.
There are three options for crash data uploads, and two options for diagnostics and
environment data:
n Disabled – The default setting for each diagnostics type. Neither automatic crash file
uploads nor manual triggering of any uploads is available.
n Manual – You manually start the sensordiag utility tool via the command line. No data
is automatically uploaded. Running the tool collects and uploads the data type that is
specified by a command-line switch (Crash, Diagnostic, Environment, or any combination).
n Automatic – The sensor automatically collects and uploads crash data when a crash is
detected on the sensor. Although diagnostic and environment data cannot be uploaded
automatically, selecting Automatic also enables the sensordiag utility so that you can
manually collect and upload these data types.
Carbon Black EDR Sensor Installation Guide
VMware by Broadcom 41

File Transfer and Security
Each collection of sensor diagnostic files is packaged as a zip file on the sensor before
uploaded to the Carbon Black EDR server. From the Carbon Black EDR server, uploaded
sensor diagnostic files are sent to the Carbon Black cloud, and are encrypted until and unless
they are accessed by authorized Carbon Black representatives.
To avoid sending oversized files over an HTTP request, the uploaded file size is limited to
5MB. Files larger than 5MB are split into multiple files during transit.
Files are uploaded to the Carbon Black EDR server on first-come-first-serve basis. Only one
file can be uploaded to a server at a time. If additional sensors check in for an upload while an
upload is already in progress, a “Try Again” message is sent to sensor so that it can try again
at a later time. In a clustered environment, multiple simultaneous uploads are possible.
After the upload succeeds, the zip file is removed from the sensor.
Automatically Upload macOS Sensor Diagnostic Data
Beginning with Carbon Black EDR server release 6.2.2, diagnostics from sensor crashes can be
collected and uploaded automatically for storage in a cloud location. This provides rapid access
to the data by Carbon Black sensor experts when an issue requires troubleshooting.
When a sensor checks-in with a Carbon Black EDR server, it receives the current setting for Allow
Upload of Sensor Diagnostics Data. If the setting is Automatic, if there is crash data available, the
sensor will initiate upload of that data.
Automatic upload of sensor crash data is disabled by default. You must opt-in to enable it. To
enable automatic uploads, see Enable macos Sensor Diagnostics Uploads.
Manually Upload macOS Sensor Diagnostics Data
If you choose Manual for Allow Upload of Sensor Diagnostics Data on the Shared Settings page,
you initiate data collection and uploads by executing a command line utility.
Carbon Black EDR Sensor Installation Guide
VMware by Broadcom 42

Prerequisites
Before you can manually upload sensor diagnostic data, you must opt-in. To do so, see Enable
macos Sensor Diagnostics Uploads.
Procedure
u Run the following command using this syntax:
sensordiag -type CDE [-startdate YYYY-MM-DD [THH:MM:SSZZZZ] ]
[-enddate YYYY-MM-DD [THH:MM:SSZZZZ] ] [-upload [<number of seconds>] ] [-remember ]
The -type options determine what data is uploaded:
n C: Crash reports for Carbon Black user-mode Service and Sensor Diags
n D: Diagnostics reports
n E: Environment reports
Other options are as follows:
n startdate/enddate: For manually collected sensor diags, you can specify the range of
diagnostic files to include in the zip file. This is based on their modified date (date created
or dates inside files are not considered for this parameter).
n upload: When you run the sensor diagnostics command manually, this option must be
specified if you want the resulting zip file uploaded to the Carbon Black EDR server
– otherwise it just remains on the sensor. If a time argument is specified, the tool will
only look for files that were modified within the start and end dates specified. If a time
argument is not specified, the tool will capture logs from the beginning of the day until
the current time.
n remember: This option uses the end date of the most recent sensor diagnostics zip file as
the startdate for a new one.
Data Collected by macOS Sensor Diagnostics
Your organization might have specific standards for what kind of information may be uploaded to
a third party such as Carbon Black.
To help you decide whether the sensor diagnostic upload features meet your organization's
standards, the following table shows the type of information each option uploads.
Table 8-3. Uploaded Data Types
Crash Logs Diagnostic Reports Environment Data
File name No Yes (1) Yes (5)
File path No Yes (1) Yes (5)
IP address No Yes (1) No
Command line No Yes (2) No
Carbon Black EDR Sensor Installation Guide
VMware by Broadcom 43

Table 8-3. Uploaded Data Types (continued)
Crash Logs Diagnostic Reports Environment Data
Network operations
(device names)
No Yes (3) No
File writer name No No No
Audit logs (user name) No No No
Username associated with
process
No No No
Hostname Yes (4) Yes (4) Yes (4)
Full binary No No No
File metadata No No No
Email address No No No
n (1) - File names and file paths (which include the file name) and IP addresses appear in
CbOsxSensorService log files.
n (2) - Command lines appear in log files in certain error situations.
n (3) - Device names appear in the log together with IP addresses (1).
n (4) - The hostname is part of the name of the zip file that is sent to Carbon Black.
n (5) - System logs are collected, which can contain path names logged from other processes.
n (6) - Hostname is shown in system profiler information.
Troubleshooting Linux Sensor Installations
This section describes how to troubleshoot Linux sensor installation errors.
Verify Linux Sensor Installations
This section describes places how to verify a Linux sensor installation.
Table 8-4. Key Files for Linux Sensor Installation Success
Path Description
/etc/init.d/cbdaemon
Sensor daemon script
/usr/sbin/cbdaemon
Sensor daemon executable
/lib/modules/$(uname -r)/kernel/lib/
cbsensor.ko
Sensor kernel module (6.1.x)
/opt/carbonblack/response/modules/cbsensor.ko
Sensor kernel module (6.2.x)
/etc/sysconfig/modules/cbsensor.modules
Kernel autostart file
Carbon Black EDR Sensor Installation Guide
VMware by Broadcom 44

Table 8-4. Key Files for Linux Sensor Installation Success (continued)
Path Description
/opt/cbsensor/sensordiag.sh
Sensor diagnostics file (6.1.x)
/opt/carbonblack/response/bin/sensordiag.sh
Sensor diagnostics file (6.2.x)
/opt/cbsensor/sensoruninstall.sh
Sensor uninstall file (6.1.x)
/opt/carbonblack/response/bin/
sensoruninstall.sh
Sensor uninstall file (6.2.x)
/var/lib/cb/config.ini
Configuration file (6.1.x)
/var/opt/carbonblack/response/config.ini
Configuration file (6.2.x)
/var/lib/cb/sensorsettings.ini
Settings file (6.1.x)
/var/opt/carbonblack/response/
sensorsettings.ini
Settings file (6.2.x)
n To verify that the sensor daemon is running, issue the following command:
pidof cbdaemon
Exactly one PID should be returned.
n To verify that the sensor kernel module is running, issue this command:
lsmod | grep cbsensor
If the sensor kernel module is running, the output should show one item.
Note Verification for RHEL8.x/SUSE/Ubuntu:
n A /usr/sbin/cb_ebpftool directory contains pertinent files.
n No /lib/modules/`uname -r`/kernel/lib/cbsensor.ko file exists because there is no
kernel module.
n No /etc/init.d/cbdaemon exists; instead, there are /etc/systemd/system/
{cbdaemon.service,cbebpfdaemon.service,cbkernelupdate.service}
n No cbsensor module is loaded.
To check if the sensor is installed correctly, issue this command:
rpm -qa cbsensor
If the sensor is installed, a single line displays the version and build numbers. For example:
cbsensor-v6.2.0.60603-1.x86_64
Carbon Black EDR Sensor Installation Guide
VMware by Broadcom 45

For RHEL8.x/SUSE/Ubuntu the kernel header package matching the running kernel must also be
installed. The install will attempt to install this package if it is not already installed; however this
can fail if, for example, the repository is not set up.
On RHEL 8.x, search for this with (rpm -qa | grep kernel-debug-devel).
On SUSE, search for the kernel header package with (rpm -qa | grep kernel-devel).
General Logging to Troubleshoot Linux Sensor Installations
The user mode portion of the sensor creates an execution log in the following locations.
n For a version 6.2.x or higher Linux sensor:
/var/opt/carbonblack/response/log/cbdaemon.log
When the current log file reaches a size threshold (currently 100MB), it rolls over to
cbdaemon1.log and a new cbdaemon.log is started. You might see log files named
cbdaemon[1-5].log, with cbdaemon5.log being the oldest.
n For a version 6.1.x Linux sensor:
/var/log/cbsensor/cbdaemon.INFO
This log file is a symbolic link that is recreated each time the daemon runs. The default log
level is set to WARNING. This results in the generation of log files for WARNING and ERROR
levels:
/var/log/cbsensor/cbdaemon.WARNING
/var/log/cbsensor/cbdaemon.ERROR
The kernel module logs messages to /var/log/messages.
Issue this command in a terminal to dump kernel messages in real time:
sudo tail -f /var/log/messages | grep CbSensor
n The kernel module logs messages to /var/log/messages.
Issue this command in a terminal to dump kernel messages in real time:
sudo tail -f /var/log/messages | grep CbSensor
n For RHEL8.x/SUSE/Ubuntu an ebpfdaemon error log file exists that you can check: /tmp/
cbebpf_error.log.
Generate Linux Sensor Communication History
You can create a log file that provides the Linux sensor communication history.
Carbon Black EDR Sensor Installation Guide
VMware by Broadcom 46
Procedure
u Running inside a terminal as root and sending the SIGUSR2 signal (via su), issue this
command:
kill -s12 $(pidof cbdaemon)
The log is located at /var/tmp/cb/sensor_comms.log. Each transaction has a HRESULT,
which can be one of the following:
Table 8-5. HRESULT
Facility Number Description Error Code Value
204 OS level errors Maps to errno
25 HTTP ererors HTTP error code
200 Curl errors See http://curl.haxx.se/libcurl/c/
libcurl-errors.html.
201 Curl form errors
Note For sensor version 6.2+, the log location is /var/opt/carbonblack/response/
diagnostics. In some sensor versions you might need to run a mkdir /var/opt/
carbonblack/response/diagnostics command first.
Manually Start and Stop Linux Sensor Daemon
For troubleshooting purposes, you can manually start and stop the Linux sensor daemon.
Procedure
1 To restart the service, open a terminal and issue this command:
sudo service cbdaemon restart
2 To start the service, open a terminal and issue this command:
sudo service cbdaemon start
3 To stop the service, open a terminal and issue this command:
sudo service cbdaemon stop
Note If the sensor crashes, you might need to delete the following file to eliminate an error
when trying to start the daemon: /var/run/cbdaemon.pid
For 6.1.x the file is /var/lib/pid and for 6.2.x, the file is /var/run/cbdaemon.pid.
Carbon Black EDR Sensor Installation Guide
VMware by Broadcom 47
Determine Linux Sensor Version
You can determine the version of cbdaemon that is running.
Procedure
u Issue the following command from a terminal:
cbdaemon -v
Determine Server URL to Troubleshoot Linux Sensor Installations
Follow this procedure to determine the server URL that is being used by the sensor.
Procedure
u Follow the instructions in Generate Linux Sensor Communication History to create a
communication log. The server URL appears at the top of the generated log file contents.
Initiate an Immediate Linux Sensor Check-in to the Carbon Black EDR
Server
For troubleshooting purposes, you can initiate an immediate Linux sensor check-in to the Carbon
Black EDR server.
Procedure
u Running inside a terminal as root and sending the SIGUSR1 signal (via su), issue this command:
kill -n 10 $(pidof cbdaemon)
Linux Driver Debug Parameters
You can pass arguments to the driver to control debug behavior.
Two arguments can be passed to the driver to control the debug behavior:
n g_traceLevel – Controls debug trace output flags (6.1. only).
n g_eventFilter – Controls which event types are generated.
These arguments can be passed in the /etc/sysconfig/modules/cbsensor.modules file or as
described in the following version-specific sections.
Sensor Version 6.1.x Driver Debug Parameters
For version 6.1.x sensors, use one of the following commands:
sudo insmod cbsensor.ko g_traceLevel=<value> g_eventFilter=<value>:
insmod cbsensor.ko g_traceLevel=0x00200000
Carbon Black EDR Sensor Installation Guide
VMware by Broadcom 48

OR
modprobe cbsensor g_traceLevel=0x00200000
where 0x00200000 is hook tracing.
The full list of levels is:
#define DL_INIT 0x00000001
#define DL_SHUTDOWN 0x00000002
#define DL_WARNING 0x00000004
#define DL_ERROR 0x00000008
#define DL_INFO 0x00000010
#define DL_REQUEST 0x00000100
#define DL_HOOK 0x00200000
#define DL_VERBOSE 0x08000000
#define DL_ENTRY 0x10000000
#define DL_EXIT 0x20000000
Create the log level mask you want, OR the individual levels.
Sensor Version 6.2.x Driver Debug Parameters
For version 6.2.2 sensors and later, the preferred method for setting the debug logging
subsystem level is by editing /proc/debug-subsystems. In this file, the debug subsystem value
is reported in hexadecimal as an 'or' of the following values.
An alternative to editing debug-subsystems is to use the following command:
sudo insmod cbsensor.ko g_debug_subsystem=<value> g_eventFilter=<value>
The subsystems are defined as:
#define DS_COMMS 0x0002
#define DS_FILE 0x0004
#define DS_HASH 0x0008
#define DS_BAN 0x0010
#define DS_HOOK 0x0020
#define DS_ISOLATE 0x0040
#define DS_LOG 0x0080
#define DS_LSM 0x0100
#define DS_MOD 0x0200
#define DS_NET 0x0400
#define DS_PROC 0x0800
#define DS_PROCFS 0x1000
#define DS_TEST 0x8000
If DS_TEST is specified, the enabled log levels and subsystems are logged to the system log (use
dmesg to view). This is done at module load time when specified as a parameter.
Carbon Black EDR Sensor Installation Guide
VMware by Broadcom 49
Subsystem debug messages are reported at KERN_INFO level. The minimum kernel logging
level must be at least KERN_INFO for these messages to be reported. It can be set at runtime
via
/proc/sys/kernel/printk or at boot time by setting the loglevel kernel command line
parameter.
Linux Daemon Debug Options
There are options for the Carbon Black EDR initialization file that you can use for daemon
debugging.
Debugging Parameters for 6.1.x Sensors
For 6.1.x version sensors, there are options for the Carbon Black EDR initialization file that you
can use for daemon debugging. This file is located at /var/lib/cb/sensorsettings.ini.
When you set one or both of these options, you can use SIGHUP to reread the
sensorsettings.ini file and update the log settings.
$ sudo killall cbdaemon -SIGHUP
The two debugging options are:
n DaemonLogLevel — You can set this to any of the following: Error, Warning, Info, Debug1,
Debug2, Debug3, Debug4, Debug5. DaemonLogLevel is not set in the ini file. The default
DaemonLogLevel is Warning.
n SensorLogLevel — This option is a string value in the form:
<base level>[/<extra level>[/..]]
where the possible values of <
base level
> are Error, Warning, Info, and Debug, and the
possible values of <
extra level
> are Hook, Request, Entry, Exit, Comms, and Trace.
In most cases only <
base level
> will need to be set. If SensorLogLevel is not set in the ini file,
the default value is Warning.
Note If you deployed sensor versions prior to 6.1, be aware of the following changes:
n Due to the additional granularity now available in the daemon, many of the debugging
messages have been decreased in priority.
n The Info level can provide a good overview of observed events without providing excessive
output.
n Some of the log messages are more uniform. The most notable change is that "FILE EVENT"
messages now display the type of file event as a string instead of an integer value. For
example, "FILE_OPEN EVENT" and "FILE_CLOSE EVENT".
Carbon Black EDR Sensor Installation Guide
VMware by Broadcom 50

Debugging Parameters for 6.2.x Sensors and Later
For sensors at version 6.2.1 and later, use the preceding procedures described for daemon
debugging, noting the following changes:
n The initialization file that you edit is in a different location than earlier sensors: /var/opt/
carbonblack/response/sensorsettings.ini
n The DaemonLogLevel values were changed for the 6.2.x sensor. The new levels are: None,
Error, Warning, Info, and Verbose.
n As of version 6.2.2, SensorLogLevel is no longer a valid option and will be ignored.
Initiate a Linux Sensor Diagnostic Data Dump
Running the sensordiag.sh script dumps and collects network event logs, cbdaemon log files,
and important sensor and system configurations that can help diagnose Linux sensor issues. The
script packages these files into a single compressed file that you can deliver to Carbon Black for
analysis.
Procedure
u Generate a .tar.gz file in the current directory for diagnostic purposes by issuing this
command:
sudo /opt/carbonblack/response/bin/sensordiag.sh
Carbon Black EDR Sensor Installation Guide
VMware by Broadcom 51

Document History
9
The following changes were made to this document:
Date
Associated Software
Version Topic Change Description
14 August 2024 N/A Verify Linux 7.1+ Install Files Additional updates to
download and install public
key instructions
19 July 2024 N/A Verify Linux 7.1+ Install Files Added step to download
and install public key
10 April 2024 Linux 7.3.0 n Enabling FIPS for
Windows Sensors
n Enable FIPS 140-2 for
Linux Sensor 7.3.0+
Added new topics
02 April 2024 N/A Chapter 5 Upgrading
Carbon Black EDR Sensors
Removed referral
to release note
regarding possible reboot
requirement
06 March 2024 N/A Windows Sensor Host File
Encoding Support
Added new topic
22 September 2022 N/A All 508 compliance updates
8 March 2022 N/A n Approving Network
Filtering with MDM
n Grant the Sensor Full
Disk Access with MDM
Removed extra spaces in
command lines (macOS)
3 March 2022 N/A All Disassociated this guide
from server versioning
3 March 2022 Linux 7.1 n Verify Linux 7.1+ Install
Files
n Chapter 6 Downgrading
Carbon Black EDR Linux
Sensors
New topics
VMware by Broadcom 52
